Microsoft Azure AI-900 2nd
Explore computer vision in Microsoft Azure
Computer vision is an area of artificial intelligence (AI) in which software systems are designed to perceive the world visually, though cameras, images, and video. There are multiple specific types of computer vision problem that AI engineers and data scientists can solve using a mix of custom machine learning models and platform-as-a-service (PaaS) solutions - including many cognitive services in Microsoft Azure.

Analyze images with the Computer Vision service
Introduction
Computer vision is one of the core areas of artificial intelligence (AI), and focuses on creating solutions that enable AI-enabled applications to "see" the world and make sense of it.
Of course, computers don't have biological eyes that work the way ours do, but they are capable of processing images; either from a live camera feed or from digital photographs or videos. This ability to process images is the key to creating software that can emulate human visual perception.
To an AI application, an image is just an array of pixel values. These numeric values can be used as features to train machine learning models that make predictions about the image and its contents.
In Microsoft Azure, the Computer Vision cognitive service uses pre-trained models to analyze images, enabling software developers to easily build applications that can:
- Interpret an image and suggest an appropriate caption.
- Suggest relevant tags that could be used to index an image.
- Categorize an image.
- Identify objects in an image.
- Detect faces and people in an image.
- Recognize celebrities and landmarks in an image.
- Read text in an image.
In this module, you'll explore some of these capabilities as you learn how to use the Computer Vision service to analyze images.
Get started with image analysis on Azure
The Computer Vision service is a cognitive service in Microsoft Azure that provides pre-built computer vision capabilities. The service can analyze images, and return detailed information about an image and the objects it depicts.
Azure resources for Computer Vision
To use the Computer Vision service, you need to create a resource for it in your Azure subscription. You can use either of the following resource types:
- Computer Vision: A specific resource for the Computer Vision service. Use this resource type if you don't intend to use any other cognitive services, or if you want to track utilization and costs for your Computer Vision resource separately.

- Cognitive Services: A general cognitive services resource that includes Computer Vision along with many other cognitive services; such as Text Analytics, Translator Text, and others. Use this resource type if you plan to use multiple cognitive services and want to simplify administration and development.

Whichever type of resource you choose to create, it will provide two pieces of information that you will need to use it:
- A key that is used to authenticate client applications.
- An endpoint that provides the HTTP address at which your resource can be accessed.

Note
If you create a Cognitive Services resource, client applications use the same key and endpoint regardless of the specific service they are using.
Analyzing images with the Computer Vision service
After you've created a suitable resource in your subscription, you can submit images to the Computer Vision service to perform a wide range of analytical tasks.
Describing an image
Computer Vision has the ability to analyze an image, evaluate the objects that are detected, and generate a human-readable phrase or sentence that can describe what was detected in the image. Depending on the image contents, the service may return multiple results, or phrases. Each returned phrase will have an associated confidence score, indicating how confident the algorithm is in the supplied description. The highest confidence phrases will be listed first.
To help you understand this concept, consider the following image of the Empire State building in New York. The returned phrases are listed below the image in the order of confidence.

- A black and white photo of a city
- A black and white photo of a large city
- A large white building in a city
Tagging visual features
The image descriptions generated by Computer Vision are based on a set of thousands of recognizable objects, which can be used to suggest tags for the image. These tags can be associated with the image as metadata that summarizes attributes of the image; and can be particularly useful if you want to index an image along with a set of key terms that might be used to search for images with specific attributes or contents.
For example, the tags returned for the Empire State building image include:
- skyscraper
- tower
- building
Detecting objects
The object detection capability is similar to tagging, in that the service can identify common objects; but rather than tagging, or providing tags for the recognized objects only, this service can also return what is known as bounding box coordinates. Not only will you get the type of object, but you will also receive a set of coordinates that indicate the top, left, width, and height of the object detected, which you can use to identify the location of the object in the image, like this:

Detecting brands
This feature provides the ability to identify commercial brands. The service has an existing database of thousands of globally recognized logos from commercial brands of products.
When you call the service and pass it an image, it performs a detection task and determine if any of the identified objects in the image are recognized brands. The service compares the brands against its database of popular brands spanning clothing, consumer electronics, and many more categories. If a known brand is detected, the service returns a response that contains the brand name, a confidence score (from 0 to 1 indicating how positive the identification is), and a bounding box (coordinates) for where in the image the detected brand was found.
For example, in the following image, a laptop has a Microsoft logo on its lid, which is identified and located by the Computer Vision service.

Detecting faces
The Computer Vision service can detect and analyze human faces in an image, including the ability to determine age and a bounding box rectangle for the location of the face(s). The facial analysis capabilities of the Computer Vision service are a subset of those provided by the dedicated Face Service. If you need basic face detection and analysis, combined with general image analysis capabilities, you can use the Computer Vision service; but for more comprehensive facial analysis and facial recognition functionality, use the Face service.
The following example shows an image of a person with their face detected and approximate age estimated.

Categorizing an image
Computer Vision can categorize images based on their contents. The service uses a parent/child hierarchy with a "current" limited set of categories. When analyzing an image, detected objects are compared to the existing categories to determine the best way to provide the categorization. As an example, one of the parent categories is people_. This image of a person on a roof is assigned a category of people_.

A slightly different categorization is returned for the following image, which is assigned to the category people_group because there are multiple people in the image:

Review the 86-category list here.
Detecting domain-specific content
When categorizing an image, the Computer Vision service supports two specializ ed domain models:
- Celebrities - The service includes a model that has been trained to identify thousands of well-known celebrities from the worlds of sports, entertainment, and business.
- Landmarks - The service can identify famous landmarks, such as the Taj Mahal and the Statue of Liberty.
For example, when analyzing the following image for landmarks, the Computer Vision service identifies the Eiffel Tower, with a confidence of 99.41%.

Optical character recognition
The Computer Vision service can use optical character recognition (OCR) capabilities to detect printed and handwritten text in images. This capability is explored in the Read text with the Computer Vision service module on Microsoft Learn.
Additional capabilities
In addition to these capabilities, the Computer Vision service can:

- Detect image types - for example, identifying clip art images or line drawings.
- Detect image color schemes - specifically, identifying the dominant foreground, background, and overall colors in an image.
- Generate thumbnails - creating small versions of images.
- Moderate content - detecting images that contain adult content or depict violent, gory scenes.
Exercise - Analyze images with the Computer Vision service
The best way to learn about the capabilities of the Computer Vision service is to explore it for yourself.
Before you start
To complete this exercise, you'll need the following:
- A Microsoft Azure subscription. If you don't already have one, you can sign up for a free trial at https://azure.microsoft.com/free .
- A Python environment in which you can run the Jupyter notebooks in the MicrosoftDocs/ai-fundamentals GitHub repository. You can clone the lab files from GitHub into your own Python environment if you have one, or you can follow the instructions below to create an Azure Machine Learning workspace in your Azure subscription.
Note
This module is one of many that make use of an Azure Machine Learning workspace. If you are completing this module in preparation for the Azure AI Fundamentals certification, you can create the workspace once, and reuse it for all of the modules for that certification track. After completing the exercise, be sure to follow the Clean Up instructions to stop compute resources between modules.
Create an Azure Machine Learning workspace
If you already have an Azure Machine Learning workspace in your Azure subscription, in a new browser tab, navigate to Azure Machine Learning studio and sign into Azure Machine Learning studio using your Microsoft account. Otherwise, follow these steps to create a new workspace:
- Sign into the Azure portal using the Microsoft account associated with your Azure subscription.
- Select +Create a resource, search for Machine Learning, and create a new Machine Learning resource with the following settings:
- Workspace Name: enter a unique name of your choice
- Subscription: your Azure subscription
- Resource group: create a new resource group with a unique name
- Location: choose any available location
- Workspace edition: Enterprise
- Wait for your workspace resource to be created (it can take a few minutes). Then go to it in the portal, and on the Overview page for your workspace, launch Azure Machine Learning studio (or open a new browser tab and navigate to https://ml.azure.com ), and sign into Azure Machine Learning studio using your Microsoft account.
- In Azure Machine Learning studio, toggle the ☰ icon at the top left to view the various pages in the interface. You can use these pages to manage the resources in your workspace.

Create a compute instance
To run the notebook used in this exercise, you will need a compute instance in your Azure Machine Learning workspace. If you already have one, start it; otherwise, follow these instructions to create one:
- In Azure Machine Learning studio , view the Compute page (under Manage).
- On the Compute Instances tab, create a new compute instance with the following settings:
- Compute name: enter a unique name
- Virtual Machine type: CPU
- Virtual Machine size: Standard_DS2_v2
- Wait for the compute instance to start (this may take a minute or so)
Download the exercise files
The files used in this module (and other related modules) are published in a GitHub repository, which you need to clone to your Python environment. If you haven't already cloned the ai-fundamentals repository in a previous module, use the following steps to clone it to your Azure Machine Learning workspace:
In Azure Machine Learning studio , view the Notebooks page (under Author). This page contains a notebook editor that you can use to run notebooks.
Under My files, use the 🗋 button to create a new file with the following settings:
- File location: Users/your user name
- File name: Get-Files
- File type: Notebook
- Overwrite if already exists: Selected
When the new notebook has been created, ensure that the compute instance you created previously is selected in the Compute box, and that it has a status of Running. Then, in the rectangular cell that has been created in the notebook, paste the following code:
!git clone https://github.com/MicrosoftDocs/ai-fundamentalsUse the ▷ button next to the cell to run the code it contains. This will clone the exercise files from GitHub.
When the code has finished running and the checkout of the file is done, use the ↻ button under My files to refresh the folder view, and verify that a folder named ai-fundamentals has been created. This folder contains notebooks and other files used in the exercise.
Close the Get-Files.ipynb notebook tab.
Complete the exercise
After you have set up the Python environment and cloned the ai-fundamentals repository, you're ready to explore image analysis with Computer Vision.
- Open the Image Analysis with Computer Vision.ipynb notebook in the ai-fundamentals folder. If you're using the notebook editor in Azure Machine Learning studio, use the ≪ button to collapse the file explorer pane and give you more room to focus on the notebook tab.
- Read the information in the notebook, and run the code cells it contains in order.
Clean-up
If you used a compute instance in Azure Machine Learning studio, you should stop it to avoid using Azure credits unnecessarily.
- In Azure Machine Learning studio, view the Compute page (under Manage).
- On the Compute Instances tab, select your compute instance and then use the Stop button to stop it.
Explore natural language processing
Introduction
Analyzing text is a process where you evaluate different aspects of a document or phrase, in order to gain insights into the content of that text. For the most part, humans are able to read some text and understand the meaning behind it. Even without considering grammar rules for the language the text is written in, specific insights can be identified in the text.
As an example, you might read some text and identify some key phrases that indicate the main talking points of the text. You might also recognize names of people or well-known landmarks such as the Eiffel Tower. Although difficult at times, you might also be able to get a sense for how the person was feeling when they wrote the text, also commonly known as sentiment.
Text Analytics Techniques
Text analytics is a process where an artificial intelligence (AI) algorithm, running on a computer, evaluates these same attributes in text, to determine specific insights. A person will typically rely on their own experiences and knowledge to achieve the insights. A computer must be provided with similar knowledge to be able to perform the task. There are some commonly used techniques that can be used to build software to analyze text, including:
- Statistical analysis of terms used in the text. For example, removing common "stop words" (words like "the" or "a", which reveal little semantic information about the text), and performing frequency analysis of the remaining words (counting how often each word appears) can provide clues about the main subject of the text.
- Extending frequency analysis to multi-term phrases, commonly known as N-grams (a two-word phrase is a bi-gram, a three-word phrase is a tri-gram, and so on).
- Applying stemming or lemmatization algorithms to normalize words before counting them - for example, so that words like "power", "powered", and "powerful" are interpreted as being the same word.
- Applying linguistic structure rules to analyze sentences - for example, breaking down sentences into tree-like structures such as a noun phrase, which itself contains nouns, verbs, adjectives, and so on.
- Encoding words or terms as numeric features that can be used to train a machine learning model. For example, to classify a text document based on the terms it contains. This technique is often used to perform sentiment analysis, in which a document is classified as positive or negative.
- Creating vectorized models that capture semantic relationships between words by assigning them to locations in n-dimensional space. This modeling technique might, for example, assign values to the words "flower" and "plant" that locate them close to one another, while "skateboard" might be given a value that positions it much further away.
While these techniques can be used to great effect, programming them can be complex. In Microsoft Azure, the Text Analytics cognitive service can help simplify application development by using pre-trained models that can:
- Determine the language of a document or text (for example, French or English).
- Perform sentiment analysis on text to determine a positive or negative sentiment.
- Extract key phrases from text that might indicate its main talking points.
- Identify and categorize entities in the text. Entities can be people, places, organizations, or even everyday items such as dates, times, quantities, and so on.
In this module, you'll explore some of these capabilities and gain an understanding of how you might apply them to applications such as:
- A social media feed analyzer to detect sentiment around a political campaign or a product in market.
- A document search application that extracts key phrases to help summarize the main subject matter of documents in a catalog.
- A tool to extract brand information or company names from documents or other text for identification purposes.
These examples are just a small sample of the many areas that Text Analytics can help with.
Get started with Text Analytics on Azure
The Text Analytics service is a part of the Azure Cognitive Services offerings that can perform advanced natural language processing over raw text.
Azure resources for the Text Analytics service
To use the Text Analytics service in an application, you must provision an appropriate resource in your Azure subscription. You can choose to provision either of the following types of resource:

- A Text Analytics resource - choose this resource type if you only plan to use the Text Analytics service, or if you want to manage access and billing for the resource separately from other services.
- A Cognitive Services resource - choose this resource type if you plan to use the Text Analytics service in combination with other cognitive services, and you want to manage access and billing for these services together.
Language detection
Use the language detection capability of the Text Analytics service to identify the language in which text is written. You can submit multiple documents at a time for analysis. For each document submitted to it, the service will detect:

- The language name (for example "English").
- The ISO 6391 language code (for example, "en").
- A score indicating a level of confidence in the language detection.
For example, consider a scenario where you own and operate a restaurant where customers can complete surveys and provide feedback on the food, the service, staff, and so on. Suppose you have received the following reviews from customers:
Review 1: "A fantastic place for lunch. The soup was delicious."
Review 2: "Comida maravillosa y gran servicio."
Review 3: "The croque monsieur avec frites was terrific. Bon appetit!"
You can use the Text Analytics service to detect the language for each of these reviews; and it might respond with the following results:
Notice that the language detected for review 3 is English, despite the text containing a mix of English and French. The language detection service will focus on the predominant language in the text. The service uses an algorithm to determine the predominant language, such as length of phrases or total amount of text for the language compared to other languages in the text. The predominant language will be the value returned, along with the language code. The confidence score may be less than 1 as a result of the mixed language text.
Ambiguous or mixed language content
There may be text that is ambiguous in nature, or that has mixed language content. These situations can present a challenge to the service. An ambiguous content example would be a case where the document contains limited text, or only punctuation. For example, using the service to analyze the text ":-)", results in a value of unknown for the language name and the language identifier, and a score of NaN (which is used to indicate not a number).
Sentiment analysis
The Text Analytics service can evaluate text and return sentiment scores and labels for each sentence. This capability is useful for detecting positive and negative sentiment in social media, customer reviews, discussion forums and more.
Using the pre-built machine learning classification model, the service evaluates the text and returns a sentiment score in the range of 0 to 1, with values closer to 1 being a positive sentiment. Scores that are close to the middle of the range (0.5) are considered neutral or indeterminate.
For example, the following two restaurant reviews could be analyzed for sentiment:
"We had dinner at this restaurant last night and the first thing I noticed was how courteous the staff was. We were greeted in a friendly manner and taken to our table right away. The table was clean, the chairs were comfortable, and the food was amazing."
and
"Our dining experience at this restaurant was one of the worst I've ever had. The service was slow, and the food was awful. I'll never eat at this establishment again."
The sentiment score for the first review might be around 0.9, indicating a positive sentiment; while the score for the second review might be closer to 0.1, indicating a negative sentiment.
Indeterminate sentiment
A score of 0.5 might indicate that the sentiment of the text is indeterminate, and could result from text that does not have sufficient context to discern a sentiment or insufficient phrasing. For example, a list of words in a sentence that has no structure, could result in an indeterminate score. Another example where a score may be 0.5 is in the case where the wrong language code was used. A language code (such as "en" for English, or "fr" for French) is used to inform the service which language the text is in. If you pass text in French but tell the service the language code is en for English, the service will return a score of precisely 0.5.
Key phrase extraction
Key phrase extraction is the concept of evaluating the text of a document, or documents, and then identifying the main talking points of the document(s). Consider the restaurant scenario discussed previously. Depending on the volume of surveys that you have collected, it can take a long time to read through the reviews. Instead, you can use the key phrase extraction capabilities of the Text Analytics service to summarize the main points.
You might receive a review such as:
"We had dinner here for a birthday celebration and had a fantastic experience. We were greeted by a friendly hostess and taken to our table right away. The ambiance was relaxed, the food was amazing, and service was terrific. If you like great food and attentive service, you should try this place."
Key phrase extraction can provide some context to this review by extracting the following phrases:
- attentive service
- great food
- birthday celebration
- fantastic experience
- table
- friendly hostess
- dinner
- ambiance
- place
Not only you can use sentiment analysis to determine that this review is positive, you can use the key phrases to identify important elements of the review.
Entity recognition
You can provide the Text Analytics service with unstructured text and it will return a list of entities in the text that it recognizes. The service can also provide links to more information about that entity on the web. An entity is essentially an item of a particular type or a category; and in some cases, subtype, such as those as shown in the following table.
The service also supports entity linking to help disambiguate entities by linking to a specific reference. For recognized entities, the service returns a URL for a relevant Wikipedia article.
For example, suppose you use the Text Analytics service to detect entities in the following restaurant review extract:
"I ate at the restaurant in Seattle last week."
Exercise - Analyze text with the Text Analytics service
The best way to learn how to analyze text with the Text Analysis service is to explore it for yourself.
Before you start
To complete this exercise, you'll need the following:
- A Microsoft Azure subscription. If you don't already have one, you can sign up for a free trial at https://azure.microsoft.com/free .
- A Python environment in which you can run the Jupyter notebooks in the MicrosoftDocs/ai-fundamentals GitHub repository. You can clone the lab files from GitHub into your own Python environment if you have one, or you can follow the instructions below to create an Azure Machine Learning workspace in your Azure subscription.
Note
This module is one of many that make use of an Azure Machine Learning workspace. If you are completing this module in preparation for the Azure AI Fundamentals certification, you can create the workspace once, and reuse it for all of the modules for that certification track. After completing the exercise, be sure to follow the Clean Up instructions to stop compute resources between modules.
Create an Azure Machine Learning workspace
If you already have an Azure Machine Learning workspace in your Azure subscription, in a new browser tab, navigate to Azure Machine Learning studio and sign into Azure Machine Learning studio using your Microsoft account. Otherwise, follow these steps to create a new workspace:
- Sign into the Azure portal using the Microsoft account associated with your Azure subscription.
- Select +Create a resource, search for Machine Learning, and create a new Machine Learning resource with the following settings:
- Workspace Name: enter a unique name of your choice
- Subscription: your Azure subscription
- Resource group: create a new resource group with a unique name
- Location: choose any available location
- Workspace edition: Enterprise
- Wait for your workspace resource to be created (it can take a few minutes). Then go to it in the portal, and on the Overview page for your workspace, launch Azure Machine Learning studio (or open a new browser tab and navigate to https://ml.azure.com ), and sign into Azure Machine Learning studio using your Microsoft account.
- In Azure Machine Learning studio, toggle the ☰ icon at the top left to view the various pages in the interface. You can use these pages to manage the resources in your workspace.
Create a compute instance
To run the notebook used in this exercise, you will need a compute instance in your Azure Machine Learning workspace. If you already have one, start it; otherwise, follow these instructions to create one:
- In Azure Machine Learning studio , view the Compute page (under Manage).
- On the Compute Instances tab, create a new compute instance with the following settings:
- Compute name: enter a unique name
- Virtual Machine type: CPU
- Virtual Machine size: Standard_DS2_v2
- Wait for the compute instance to start (this may take a minute or so)
Download the exercise files
The files used in this module (and other related modules) are published in a GitHub repository, which you need to clone to your Python environment. If you haven't already cloned the ai-fundamentals repository in a previous module, use the following steps to clone it to your Azure Machine Learning workspace:
In Azure Machine Learning studio , view the Notebooks page (under Author). This page contains a notebook editor that you can use to run notebooks.
Under My files, use the 🗋 button to create a new file with the following settings:
- File location: Users/your user name
- File name: Get-Files
- File type: Notebook
- Overwrite if already exists: Selected
When the new notebook has been created, ensure that the compute instance you created previously is selected in the Compute box, and that it has a status of Running. Then, in the rectangular cell that has been created in the notebook, paste the following code:
!git clone https://github.com/MicrosoftDocs/ai-fundamentalsUse the ▷ button next to the cell to run the code it contains. This will clone the exercise files from GitHub.
When the code has finished running and the checkout of the file is done, use the ↻ button under My files to refresh the folder view, and verify that a folder named ai-fundamentals has been created. This folder contains notebooks and other files used in the exercise.
Close the Get-Files.ipynb notebook tab.
Complete the exercise
After you have set up the Python environment and cloned the ai-fundamentals repository, you're ready to explore text analysis.
- Open the Text Analytics.ipynb notebook in the ai-fundamentals folder. If you're using the notebook editor in Azure Machine Learning studio, use the ≪ button to collapse the file explorer pane and give you more room to focus on the notebook tab.
- Read the information in the notebook, and run the code cells it contains in order.
Clean-up
If you used a compute instance in Azure Machine Learning studio, you should stop it to avoid using Azure credits unnecessarily.
- In Azure Machine Learning studio, view the Compute page (under Manage).
- On the Compute Instances tab, select your compute instance and then use the Stop button to stop it.
Recognize and synthesize speech
Introduction
Increasingly, we expect artificial intelligence (AI) solutions to accept vocal commands and provide spoken responses. Consider the growing number of home and auto systems that you can control by speaking to them - issuing commands such as "turn off the lights", and soliciting verbal answers to questions such as "will it rain today?"
To enable this kind of interaction, the AI system must support two capabilities:
- Speech recognition - the ability to detect and interpret spoken input.
- Speech synthesis - the ability to generate spoken output.
Speech recognition
Speech recognition is concerned with taking the spoken word and converting it into data that can be processed - often by transcribing it into a text representation. The spoken words can be in the form of a recorded voice in an audio file, or live audio from a microphone. Speech patterns are analyzed in the audio to determine recognizable patterns that are mapped to words. To accomplish this feat, the software typically uses multiple types of model, including:
- An acoustic model that converts the audio signal into phonemes (representations of specific sounds).
- A language model that maps phonemes to words, usually using a statistical algorithm that predicts the most probable sequence of words based on the phonemes.
The recognized words are typically converted to text, which you can use for various purposes, such as.
- Providing closed captions for recorded or live videos
- Creating a transcript of a phone call or meeting
- Automated note dictation
- Determining intended user input for further processing
Speech synthesis
Speech synthesis is in many respects the reverse of speech recognition. It is concerned with vocalizing data, usually by converting text to speech. A speech synthesis solution typically requires the following information:
- The text to be spoken.
- The voice to be used to vocalize the speech.
To synthesize speech, the system typically tokenizes the text to break it down into individual words, and assigns phonetic sounds to each word. It then breaks the phonetic transcription into prosodic units (such as phrases, clauses, or sentences) to create phonemes that will be converted to audio format. These phonemes are then synthesized as audio by applying a voice, which will determine parameters such as pitch and timbre; and generating an audio wave form that can be output to a speaker or written to a file.
You can use the output of speech synthesis for many purposes, including:
- Generating spoken responses to user input.
- Creating voice menus for telephone systems.
- Reading email or text messages aloud in hands-free scenarios.
- Broadcasting announcements in public locations, such as railway stations or airports.
Get started with speech on Azure
Microsoft Azure offers both speech recognition and speech synthesis capabilities through the Speech cognitive service, which includes the following application programming interfaces (APIs):
- The Speech-to-Text API
- The Text-to-Speech API
Azure resources for the Speech service
To use the Speech service in an application, you must provision an appropriate resource in your Azure subscription. You can choose to provision either of the following types of resource:
- A Speech resource - choose this resource type if you only plan to use the Speech service, or if you want to manage access and billing for the resource separately from other services.
- A Cognitive Services resource - choose this resource type if you plan to use the Speech service in combination with other cognitive services, and you want to manage access and billing for these services together.
The speech-to-text API
You can use the speech-to-text API to perform real-time or batch transcription of audio into a text format. The audio source for transcription can be a real-time audio stream from a microphone or an audio file.
The model that is used by the speech-to-text API, is based on the Universal Language Model that was trained by Microsoft. The data for the model is Microsoft-owned and deployed to Microsoft Azure. The model is optimized for two scenarios, conversational and dictation. You can also create and train your own custom models including acoustics, language, and pronunciation if the pre-built models from Microsoft do not provide what you need.
Real-time transcription
Real-time speech-to-text allows you to transcribe text in audio streams. You can use real-time transcription for presentations, demos, or any other scenario where a person is speaking.
In order for real-time transcription to work, your application will need to be listening for incoming audio from a microphone, or other audio input source such as an audio file. Your application code streams the audio to the service, which returns the transcribed text.
Batch transcription
Not all speech-to-text scenarios are real time. You may have audio recordings stored on a file share, a remote server, or even on Azure storage. You can point to audio files with a shared access signature (SAS) URI and asynchronously receive transcription results.
Batch transcription should be run in an asynchronous manner because the batch jobs are scheduled on a best-effort basis. Normally a job will start executing within minutes of the request but there is no estimate for when a job changes into the running state.
The text-to-speech API
The text-to-speech API enables you to convert text input to audible speech, which can either be played directly through a computer speaker or written to an audio file.
Speech synthesis voices
When you use the text-to-speech API, you can specify the voice to be used to vocalize the text. This capability offers you the flexibility to personalize your speech synthesis solution and give it a specific character.
The service includes multiple pre-defined voices with support for multiple languages and regional pronunciation, including standard voices as well as neural voices that leverage neural networks to overcome common limitations in speech synthesis with regard to intonation, resulting in a more natural sounding voice. You can also develop custom voices and use them with the text-to-speech API
Supported Languages
Both the speech-to-text and text-to-speech APIs support a variety of languages. Use the links below to find details about the supported languages:
Exercise - Use the Speech service
The best way to learn how to use the Speech service for speech recognition and synthesis is to explore it for yourself.
Before you start
To complete this exercise, you'll need the following:
- A Microsoft Azure subscription. If you don't already have one, you can sign up for a free trial at https://azure.microsoft.com/free .
- A Python environment in which you can run the Jupyter notebooks in the MicrosoftDocs/ai-fundamentals GitHub repository. You can clone the lab files from GitHub into your own Python environment if you have one, or you can follow the instructions below to create an Azure Machine Learning workspace in your Azure subscription.
Note
This module is one of many that make use of an Azure Machine Learning workspace. If you are completing this module in preparation for the Azure AI Fundamentals certification, you can create the workspace once, and reuse it for all of the modules for that certification track. After completing the exercise, be sure to follow the Clean Up instructions to stop compute resources between modules.
Create an Azure Machine Learning workspace
If you already have an Azure Machine Learning workspace in your Azure subscription, in a new browser tab, navigate to Azure Machine Learning studio and sign into Azure Machine Learning studio using your Microsoft account. Otherwise, follow these steps to create a new workspace:
- Sign into the Azure portal using the Microsoft account associated with your Azure subscription.
- Select +Create a resource, search for Machine Learning, and create a new Machine Learning resource with the following settings:
- Workspace Name: enter a unique name of your choice
- Subscription: your Azure subscription
- Resource group: create a new resource group with a unique name
- Location: choose any available location
- Workspace edition: Enterprise
- Wait for your workspace resource to be created (it can take a few minutes). Then go to it in the portal, and on the Overview page for your workspace, launch Azure Machine Learning studio (or open a new browser tab and navigate to https://ml.azure.com ), and sign into Azure Machine Learning studio using your Microsoft account.
- In Azure Machine Learning studio, toggle the ☰ icon at the top left to view the various pages in the interface. You can use these pages to manage the resources in your workspace.
Create a compute instance
To run the notebook used in this exercise, you will need a compute instance in your Azure Machine Learning workspace. If you already have one, start it; otherwise, follow these instructions to create one:
- In Azure Machine Learning studio , view the Compute page (under Manage).
- On the Compute Instances tab, create a new compute instance with the following settings:
- Compute name: enter a unique name
- Virtual Machine type: CPU
- Virtual Machine size: Standard_DS2_v2
- Wait for the compute instance to start (this may take a minute or so)
Download the exercise files
The files used in this module (and other related modules) are published in a GitHub repository, which you need to clone to your Python environment. If you haven't already cloned the ai-fundamentals repository in a previous module, use the following steps to clone it to your Azure Machine Learning workspace:
In Azure Machine Learning studio , view the Notebooks page (under Author). This page contains a notebook editor that you can use to run notebooks.
Under My files, use the 🗋 button to create a new file with the following settings:
- File location: Users/your user name
- File name: Get-Files
- File type: Notebook
- Overwrite if already exists: Selected
When the new notebook has been created, ensure that the compute instance you created previously is selected in the Compute box, and that it has a status of Running. Then, in the rectangular cell that has been created in the notebook, paste the following code:
!git clone https://github.com/MicrosoftDocs/ai-fundamentalsUse the ▷ button next to the cell to run the code it contains. This will clone the exercise files from GitHub.
When the code has finished running and the checkout of the file is done, use the ↻ button under My files to refresh the folder view, and verify that a folder named ai-fundamentals has been created. This folder contains notebooks and other files used in the exercise.
Close the Get-Files.ipynb notebook tab.
Complete the exercise
After you have set up the Python environment and cloned the ai-fundamentals repository, you're ready to explore speech recognition and synthesis.
- Open the Speech.ipynb notebook in the ai-fundamentals folder. If you're using the notebook editor in Azure Machine Learning studio, use the ≪ button to collapse the file explorer pane and give you more room to focus on the notebook tab.
- Read the information in the notebook, and run the code cells it contains in order.
Clean-up
If you used a compute instance in Azure Machine Learning studio, you should stop it to avoid using Azure credits unnecessarily.
- In Azure Machine Learning studio, view the Compute page (under Manage).
- On the Compute Instances tab, select your compute instance and then use the Stop button to stop it.
Introduction
As organizations and individuals increasingly need to collaborate with people in other cultures and geographic locations, the removal of language barriers has become a significant problem.
One solution is to find bilingual, or even multilingual, people to translate between languages. However the scarcity of such skills, and the number of possible language combinations can make this approach difficult to scale. Increasingly, automated translation, sometimes known as machine translation, is being employed to solve this problem.
Literal and semantic translation
Early attempts at machine translation applied literal translations. A literal translation is where each word is translated to the corresponding word in the target language. This approach presents some issues. For one case, there may not be an equivalent word in the target language. Another case is where literal translation can change the meaning of the phrase or not get the context correct.
For example, the French phrase "éteindre la lumière" can be translated to English as "turn off the light". However, in French you might also say "fermer la lumiere" to mean the same thing. The French verb fermer literally means to "close", so a literal translation based only on the words would indicate, in English, "close the light"; which for the average English speaker, doesn't really make sense, so to be useful, a translation service should take into account the semantic context and return an English translation of "turn off the light".
Artificial intelligence systems must be able to understand, not only the words, but also the semantic context in which they are used. In this way, the service can return a more accurate translation of the input phrase or phrases. The grammar rules, formal versus informal, and colloquialisms all need to be considered.
Text and speech translation
Text translation can be used to translate documents from one language to another, translate email communications that come from foreign governments, and even provide the ability to translate web pages on the Internet. Many times you will see a Translate option for posts on social media sites, or the Bing search engine can offer to translate entire web pages that are turned in search results.
Speech translation is used to translate between spoken languages, sometimes directly (speech-to-speech translation) and sometimes by translating to an intermediary text format (speech-to-text translation).
Get started translation in Azure
Microsoft Azure provides cognitive services that support translation. Specifically, you can use the following services:
- The Translator Text service, which supports text-to-text translation.
- The Speech service, which enables speech-to-text and speech-to-speech translation.
Azure resources for Translator Text and Speech
Before you can use the Translator Text or Speech services, you must provision appropriate resources in your Azure subscription.
There are dedicated Translator Text and Speech resource types for these services, which you can use if you want to manage access and billing for each service individually.
Alternatively, you can create a Cognitive Services resource that provides access to both services through a single Azure resource, consolidating billing and enabling applications to access both services through a single endpoint and authentication key.
Text translation with the Translator Text service
The Translator Text service is easy to integrate in your applications, websites, tools, and solutions. The service uses a Neural Machine Translation (NMT) model for translation, which analyzes the semantic context of the text and renders a more accurate and complete translation as a result.
Translator Text service language support
The Text Translator service supports text-to-text translation between more than 60 languages. When using the service, you must specify the language you are translating from and the language you are translating to using ISO 639-1 language codes, such as en for English, fr for French, and zh for Chinese. Alternatively, you can specify cultural variants of languages by extending the language code with the appropriate 3166-1 cultural code - for example, en-US for US English, en-GB for British English, or fr-CA for Canadian French.
When using the Text Translator service, you can specify one from language with multiple to languages, enabling you to simultaneously translate a source document into multiple languages.
Optional Configurations
The Translator Text API offers some optional configuration to help you fine-tune the results that are returned, including:
- Profanity filtering. Without any configuration, the service will translate the input text, without filtering out profanity. Profanity levels are typically culture-specific but you can control profanity translation by either marking the translated text as profane or by omitting it in the results.
- Selective translation. You can tag content so that it isn't translated. For example, you may want to tag code, a brand name, or a word/phrase that doesn't make sense when localized.
Speech translation with the Speech service
The Speech service includes the following application programming interfaces (APIs):
- Speech-to-text - used to transcribe speech from an audio source to text format.
- Text-to-speech - used to generate spoken audio from a text source.
- Speech Translation - used to translate speech in one language to text or speech in another.
You can use the Speech Translation API to translate spoken audio from a streaming source, such as a microphone or audio file, and return the translation as text or an audio stream. This enables scenarios such as real-time closed captioning for a speech or simultaneous two-way translation of a spoken conversation.
Speech service language support
As with the Translator Text service, you can specify one source language and one or more target languages to which the source should be translated. You can translate speech into over 60 languages.
The source language must be specified using the extended language and culture code format, such as es-US for American Spanish. This requirement helps ensure that the source is understood properly, allowing for localized pronunciation and linguistic idioms.
The target languages must be specified using a two-character language code, such as en for English or de for German.
Exercise - Translate text and speech
The best way to learn how to use the Translator Text and Speech services for translation is to explore them for yourself.
Before you start
To complete this exercise, you'll need the following:
- A Microsoft Azure subscription. If you don't already have one, you can sign up for a free trial at https://azure.microsoft.com/free .
- A Python environment in which you can run the Jupyter notebooks in the MicrosoftDocs/ai-fundamentals GitHub repository. You can clone the lab files from GitHub into your own Python environment if you have one, or you can follow the instructions below to create an Azure Machine Learning workspace in your Azure subscription.
Note
This module is one of many that make use of an Azure Machine Learning workspace. If you are completing this module in preparation for the Azure AI Fundamentals certification, you can create the workspace once, and reuse it for all of the modules for that certification track. After completing the exercise, be sure to follow the Clean Up instructions to stop compute resources between modules.
Create an Azure Machine Learning workspace
If you already have an Azure Machine Learning workspace in your Azure subscription, in a new browser tab, navigate to Azure Machine Learning studio and sign into Azure Machine Learning studio using your Microsoft account. Otherwise, follow these steps to create a new workspace:
- Sign into the Azure portal using the Microsoft account associated with your Azure subscription.
- Select +Create a resource, search for Machine Learning, and create a new Machine Learning resource with the following settings:
- Workspace Name: enter a unique name of your choice
- Subscription: your Azure subscription
- Resource group: create a new resource group with a unique name
- Location: choose any available location
- Workspace edition: Enterprise
- Wait for your workspace resource to be created (it can take a few minutes). Then go to it in the portal, and on the Overview page for your workspace, launch Azure Machine Learning studio (or open a new browser tab and navigate to https://ml.azure.com ), and sign into Azure Machine Learning studio using your Microsoft account.
- In Azure Machine Learning studio, toggle the ☰ icon at the top left to view the various pages in the interface. You can use these pages to manage the resources in your workspace.
Create a compute instance
To run the notebook used in this exercise, you will need a compute instance in your Azure Machine Learning workspace. If you already have one, start it; otherwise, follow these instructions to create one:
- In Azure Machine Learning studio , view the Compute page (under Manage).
- On the Compute Instances tab, create a new compute instance with the following settings:
- Compute name: enter a unique name
- Virtual Machine type: CPU
- Virtual Machine size: Standard_DS2_v2
- Wait for the compute instance to start (this may take a minute or so)
Download the exercise files
The files used in this module (and other related modules) are published in a GitHub repository, which you need to clone to your Python environment. If you haven't already cloned the ai-fundamentals repository in a previous module, use the following steps to clone it to your Azure Machine Learning workspace:
In Azure Machine Learning studio , view the Notebooks page (under Author). This page contains a notebook editor that you can use to run notebooks.
Under My files, use the 🗋 button to create a new file with the following settings:
- File location: Users/your user name
- File name: Get-Files
- File type: Notebook
- Overwrite if already exists: Selected
When the new notebook has been created, ensure that the compute instance you created previously is selected in the Compute box, and that it has a status of Running. Then, in the rectangular cell that has been created in the notebook, paste the following code:
Use the ▷ button next to the cell to run the code it contains. This will clone the exercise files from GitHub.
When the code has finished running and the checkout of the file is done, use the ↻ button under My files to refresh the folder view, and verify that a folder named ai-fundamentals has been created. This folder contains notebooks and other files used in the exercise.
Close the Get-Files.ipynb notebook tab.
Complete the exercise
After you have set up the Python environment and cloned the ai-fundamentals repository, you're ready to explore text and speech translation.
- Open the Translation.ipynb notebook in the ai-fundamentals folder. If you're using the notebook editor in Azure Machine Learning studio, use the ≪ button to collapse the file explorer pane and give you more room to focus on the notebook tab.
- Read the information in the notebook, and run the code cells it contains in order.
Clean-up
If you used a compute instance in Azure Machine Learning studio, you should stop it to avoid using Azure credits unnecessarily.
- In Azure Machine Learning studio, view the Compute page (under Manage).
- On the Compute Instances tab, select your compute instance and then use the Stop button to stop it.
Create a language model with Language Understanding
Introduction
In 1950, the British mathematician Alan Turing devised the Imitation Game, which has become known as the Turing Test and hypothesizes that if a dialog is natural enough, you may not know whether you're conversing with a human or a computer. As artificial intelligence (AI) grows ever more sophisticated, this kind of conversational interaction with applications and digital assistants is becoming more and more common, and in specific scenarios can result in human-like interactions with AI agents. Common scenarios for this kind of solution include customer support applications, reservation systems, and home automation among others.
To realize the aspiration of the imitation game, computers need not only to be able to accept language as input (either in text or audio format), but also to be able to interpret the semantic meaning of the input - in other words, understand what is being said.
On Microsoft Azure, language understanding is supported through the Language Understanding Intelligent Service, more commonly known as Language Understanding. To work with Language Understanding, you need to take into account three core concepts: utterances, entities, and intents.
Utterances
An utterance is an example of something a user might say, and which your application must interpret. For example, when using a home automation system, a user might use the following utterances:
"Switch the fan on."
"Turn on the light."
Entities
An entity is an item to which an utterance refers. For example, fan and light in the following utterances:
"Switch the fan on."
"Turn on the light."
You can think of the fan and light entities as being specific instances of a general device entity.
Intents
An intent represents the purpose, or goal, expressed in a user's utterance. For example, for both of the previously considered utterances, the intent is to turn a device on; so in your Language Understanding application, you might define a TurnOn intent that is related to these utterances.
A Language Understanding application defines a model consisting of intents and entities. Utterances are used to train the model to identify the most likely intent and the entities to which it should be applied based on a given input. The home assistant application we've been considering might include multiple intents, like the following examples:
In this table there are numerous utterances used for each of the intents. The intent should be a concise way of grouping the utterance tasks. Of special interest is the None intent. You should consider always using the None intent to help handle utterances that do not map any of the utterances you have entered. The None intent is considered a fallback, and is typically used to provide a generic response to users when their requests don't match any other intent.
Tip
In a Language Understanding application, the None intent is created but left empty on purpose. The None intent is a required intent and can't be deleted or renamed. Fill it with utterances that are outside of your domain.
After defining the entities and intents with sample utterances in your Language Understanding application, you can train a language model to predict intents and entities from user input - even if it doesn't match the sample utterances exactly. You can then use the model from a client application to retrieve predictions and respond appropriately.
Getting started with Language Understanding
Creating a language understanding application with Language Understanding consists of two main tasks. First you must define entities, intents, and utterances with which to train the language model - referred to as authoring the model. Then you must publish the model so that client applications can use it for intent and entity prediction based on user input.
Azure resources for Language Understanding
For each of the authoring and prediction tasks, you need a resource in your Azure subscription. You can use the following types of resource:
- Language Understanding: A dedicated resource for Language Understanding, which can be either an authoring or a prediction resource.
- Cognitive Services: A general cognitive services resource that includes Language Understanding along with many other cognitive services. You can only use this type of resource for prediction.
The separation of authoring and prediction resources is useful when you want to track resource utilization for language model training separately from client applications using the model to generate predictions.
If you choose to create a Language Understanding resource, you will be prompted to choose authoring, prediction, or both - and it's important to note that if you choose "both", then two resources are created - one for authoring and one for prediction.
Alternatively, you can use a dedicated Language Understanding resource for authoring, but deploy your model to a generic Cognitive Services resource for prediction. When your client application uses other cognitive services in addition to Language Understanding, this approach enables you to manage access to all of the cognitive services being used, including the Language Understanding prediction service, through a single endpoint and key.
Authoring
After you've created an authoring resource, you can use it to author and train a Language Understanding application by defining the entities and intents that your application will predict as well as utterances for each intent that can be used to train the predictive model.
Language Understanding provides a comprehensive collection of prebuilt domains that include pre-defined intents and entities for common scenarios; which you can use as a starting point for your model. You can also create your own entities and intents.
When you create entities and intents, you can do so in any order. You can create an intent, and select words in the sample utterances you define for it to create entities for them; or you can create the entities ahead of time and then map them to words in utterances as you're creating the intents.
You can write code to define the elements of your model, but in most cases it's easiest to author your model using the Language Understanding portal - a web-based interface for creating and managing Language Understanding applications.
[Tip] Best practice is to use the Language Understanding portal for authoring and to use the SDK for runtime predictions.
Creating intents
Define intents based on actions a user would want to perform with your application. For each intent, you should include a variety of utterances that provide examples of how a user might express the intent.
If an intent can be applied to multiple entities, be sure to include sample utterances for each potential entity; and ensure that each entity is identified in the utterance.
Creating entities
There are four types of entities:
- Machine-Learned: Entities that are learned by your model during training from context in the sample utterances you provide.
- List: Entities that are defined as a hierarchy of lists and sublists. For example, a device list might include sublists for light and fan. For each list entry, you can specify synonyms, such as lamp for light.
- RegEx: Entities that are defined as a regular expression that describes a pattern - for example, you might define a pattern like [0-9]{3}-[0-9]{3}-[0-9]{4} for telephone numbers of the form 555-123-4567.
- Pattern.any: Entities that are used with patterns to define complex entities that may be hard to extract from sample utterances.
Training the model
After you have defined the intents and entities in your model, and included a suitable set of sample utterances; the next step is to train the model. Training is the process of using your sample utterances to teach your model to match natural language expressions that a user might say to probable intents and entities.
After training the model, you can test it by submitting text and reviewing the predicted intents. Training and testing is an iterative process. After you train your model, you test it with sample utterances to see if the intents and entities are recognized correctly. If they're not, make updates, retrain, and test again.
Predicting
When you are satisfied with the results from the training and testing, you can publish your Language Understanding application to a prediction resource for consumption.
Client applications can use the model by connecting to the endpoint for the prediction resource, specifying the appropriate authentication key; and submit user input to get predicted intents and entities. The predictions are returned to the client application, which can then take appropriate action based on the predicted intent.
Exercise - Create a Language Understanding application
The best way to learn how to use Language Understanding is to explore it for yourself.
Before you start
To complete this exercise, you'll need the following:
- A Microsoft Azure subscription. If you don't already have one, you can sign up for a free trial at https://azure.microsoft.com/free .
- A Python environment in which you can run the Jupyter notebooks in the MicrosoftDocs/ai-fundamentals GitHub repository. You can clone the lab files from GitHub into your own Python environment if you have one, or you can follow the instructions below to create an Azure Machine Learning workspace in your Azure subscription.
Note
This module is one of many that make use of an Azure Machine Learning workspace. If you are completing this module in preparation for the Azure AI Fundamentals certification, you can create the workspace once, and reuse it for all of the modules for that certification track. After completing the exercise, be sure to follow the Clean Up instructions to stop compute resources between modules.
Create an Azure Machine Learning workspace
If you already have an Azure Machine Learning workspace in your Azure subscription, in a new browser tab, navigate to Azure Machine Learning studio and sign into Azure Machine Learning studio using your Microsoft account. Otherwise, follow these steps to create a new workspace:
- Sign into the Azure portal using the Microsoft account associated with your Azure subscription.
- Select +Create a resource, search for Machine Learning, and create a new Machine Learning resource with the following settings:
- Workspace Name: enter a unique name of your choice
- Subscription: your Azure subscription
- Resource group: create a new resource group with a unique name
- Location: choose any available location
- Workspace edition: Enterprise
- Wait for your workspace resource to be created (it can take a few minutes). Then go to it in the portal, and on the Overview page for your workspace, launch Azure Machine Learning studio (or open a new browser tab and navigate to https://ml.azure.com ), and sign into Azure Machine Learning studio using your Microsoft account.
- In Azure Machine Learning studio, toggle the ☰ icon at the top left to view the various pages in the interface. You can use these pages to manage the resources in your workspace.
Create a compute instance
To run the notebook used in this exercise, you will need a compute instance in your Azure Machine Learning workspace. If you already have one, start it; otherwise, follow these instructions to create one:
- In Azure Machine Learning studio , view the Compute page (under Manage).
- On the Compute Instances tab, create a new compute instance with the following settings:
- Compute name: enter a unique name
- Virtual Machine type: CPU
- Virtual Machine size: Standard_DS2_v2
- Wait for the compute instance to start (this may take a minute or so)
Download the exercise files
The files used in this module (and other related modules) are published in a GitHub repository, which you need to clone to your Python environment. If you haven't already cloned the ai-fundamentals repository in a previous module, use the following steps to clone it to your Azure Machine Learning workspace:
In Azure Machine Learning studio , view the Notebooks page (under Author). This page contains a notebook editor that you can use to run notebooks.
Under My files, use the 🗋 button to create a new file with the following settings:
- File location: Users/your user name
- File name: Get-Files
- File type: Notebook
- Overwrite if already exists: Selected
When the new notebook has been created, ensure that the compute instance you created previously is selected in the Compute box, and that it has a status of Running. Then, in the rectangular cell that has been created in the notebook, paste the following code:
!git clone https://github.com/MicrosoftDocs/ai-fundamentalsUse the ▷ button next to the cell to run the code it contains. This will clone the exercise files from GitHub.
When the code has finished running and the checkout of the file is done, use the ↻ button under My files to refresh the folder view, and verify that a folder named ai-fundamentals has been created. This folder contains notebooks and other files used in the exercise.
Close the Get-Files.ipynb notebook tab.
Complete the exercise
After you have set up the Python environment and cloned the ai-fundamentals repository, you're ready to explore language understanding.
- Open the Language Understanding.ipynb notebook in the ai-fundamentals folder. If you're using the notebook editor in Azure Machine Learning studio, use the ≪ button to collapse the file explorer pane and give you more room to focus on the notebook tab.
- Read the information in the notebook, and run the code cells it contains in order.
Clean-up
If you used a compute instance in Azure Machine Learning studio, you should stop it to avoid using Azure credits unnecessarily.
- In Azure Machine Learning studio, view the Compute page (under Manage).
- On the Compute Instances tab, select your compute instance and then use the Stop button to stop it.
Explore conversational AI
Introduction
In today's connected world, people use a variety of technologies to communicate. For example:
- Voice calls
- Messaging services
- Online chat applications
- Social media platforms
- Collaborative workplace tools
We've become so used to ubiquitous connectivity, that we expect the organizations we deal with to be easily contactable and immediately responsive through the channels we already use. Additionally, we expect these organizations to engage with us individually, and be able to answer complex questions at a personal level.
Conversational AI
While many organizations publish support information and answers to frequently asked questions (FAQs) that can be accessed through a web browser or dedicated app. The complexity of the systems and services they offer means that answers to specific questions are hard to find. Often, these organizations find their support personnel being overloaded with requests for help through phone calls, email, text messages, social media, and other channels.
Increasingly, organizations are turning to artificial intelligence (AI) solutions that make use of AI agents, commonly known as bots to provide a first-line of automated support through the full range of channels that we use to communicate. Bots are designed to interact with users in a conversational manner, as shown in this example of a chat interface:
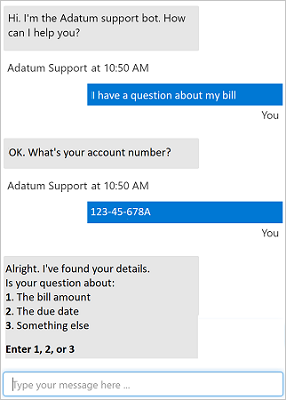
Note
The example shown here is a chat interface, such as you might find on a web site; but bots can be designed to work across multiple channels, including email, social media platforms, and even voice calls. Regardless of the channel used, bots typically manage conversation flows using a combination of natural language and constrained option responses that guide the user to a resolution.
Conversations typically take the form of messages exchanged in turns; and one of the most common kinds of conversational exchange is a question followed by an answer. This pattern forms the basis for many user support bots, and can often be based on existing FAQ documentation. To implement this kind of solution, you need:
- A knowledge base of question and answer pairs - usually with some built-in natural language processing model to enable questions that can be phrased in multiple ways to be understood with the same semantic meaning.
- A bot service that provides an interface to the knowledge base through one or more channels.
Get started with QnA Maker & Azure Bot Service
You can easily create a user support bot solution on Microsoft Azure using a combination of two core technologies:
- QnA Maker. This cognitive service enables you to create and publish a knowledge base with built-in natural language processing capabilities.
- Azure Bot Service. This service provides a framework for developing, publishing, and managing bots on Azure.
Creating a QnA Maker knowledge base
The first challenge in creating a user support bot is to use the QnA Maker service to create a knowledge base. The service provides a dedicated QnA Maker portal web-based interface that you can use to create, train, publish, and manage knowledge bases.
**Note
You can write code to create and manage knowledge bases using the QnA Maker REST API or SDK. However, in most scenarios it is easier to use the QnA Maker portal.
Provision a QnA Maker Azure resource
To create a knowledge base, you must first provision a QnA Maker resource in your Azure subscription. You can do this directly in the Azure portal before you start creating your knowledge base, or you can start developing your knowledge base in the QnA Maker portal and provision the resource when prompted.
Define questions and answers
After provisioning a QnA Maker resource, you can use the QnA Maker portal to create a knowledge base that consists of question-and-answer pairs. These questions and answers can be:
- Generated from an existing FAQ document or web page.
- Imported from a pre-defined chit-chat data source.
- Entered and edited manually.
In many cases, a knowledge base is created using a combination of all of these techniques; starting with a base dataset of questions and answers from an existing FAQ document, adding common conversational exchanges from a chit-chat source, and extending the knowledge base with additional manual entries.
Questions in the knowledge base can be assigned alternative phrasing to help consolidate questions with the same meaning. For example, you might include a question like:
What is your head office location?
You can anticipate different ways this question could be asked by adding an alternative phrasing such as:
Where is your head office located?
Train and test the knowledge base
After creating a set of question-and-answer pairs, you must train your knowledge base. This process analyzes your literal questions and answers and applies a built-in natural language processing model to match appropriate answers to questions, even when they are not phrased exactly as specified in your question definitions.
After training, you can use the built-in test interface in the QnA Maker portal to test your knowledge base by submitting questions and reviewing the answers that are returned.
Publish the knowledge base
When you're satisfied with your trained knowledge base, you can publish it so that client applications can use it over its REST interface. To access the knowledge base, client applications require:
- The knowledge base ID
- The knowledge base endpoint
- The knowledge base authorization key
Build a bot with the Azure Bot Service
After you've created and published a knowledge base, you can deliver it to users through a bot.
Create a bot for your knowledge base
You can create a custom bot by using the Microsoft Bot Framework SDK to write code that controls conversation flow and integrates with your QnA Maker knowledge base. However, an easier approach is to use the automatic bot creation functionality of QnA Maker, which enables you create a bot for your published knowledge base and publish it as an Azure Bot Service application with just a few clicks.
Extend and configure the bot
After creating your bot, you can manage it in the Azure portal, where you can:
- Extend the bot's functionality by adding custom code.
- Test the bot in an interactive test interface.
- Configure logging, analytics, and integration with other services.
For simple updates, you can edit bot code directly in the Azure portal. However, for more comprehensive customization, you can download the source code and edit it locally; republishing the bot directly to Azure when you're ready.
Connect channels
When your bot is ready to be delivered to users, you can connect it to multiple channels; making it possible for users to interact with it through web chat, email, Microsoft Teams, and other common communication media.

Users can submit questions to the bot through any of its channels, and receive an appropriate answer from the knowledge base on which the bot is based.
Exercise - Create a bot
The best way to learn about building a bot with the QnA Service and the Azure Bot Service is to explore them for yourself.
Before you start
To complete this exercise, you'll need the following:
- A Microsoft Azure subscription. If you don't already have one, you can sign up for a free trial at https://azure.microsoft.com/free .
- A Python environment in which you can run the Jupyter notebooks in the MicrosoftDocs/ai-fundamentals GitHub repository. You can clone the lab files from GitHub into your own Python environment if you have one, or you can follow the instructions below to create an Azure Machine Learning workspace in your Azure subscription.
Note
This module is one of many that make use of an Azure Machine Learning workspace. If you are completing this module in preparation for the Azure AI Fundamentals certification, you can create the workspace once, and reuse it for all of the modules for that certification track. After completing the exercise, be sure to follow the Clean Up instructions to stop compute resources between modules.
Create an Azure Machine Learning workspace
If you already have an Azure Machine Learning workspace in your Azure subscription, in a new browser tab, navigate to Azure Machine Learning studio and sign into Azure Machine Learning studio using your Microsoft account. Otherwise, follow these steps to create a new workspace:
- Sign into the Azure portal using the Microsoft account associated with your Azure subscription.
- Select +Create a resource, search for Machine Learning, and create a new Machine Learning resource with the following settings:
- Workspace Name: enter a unique name of your choice
- Subscription: your Azure subscription
- Resource group: create a new resource group with a unique name
- Location: choose any available location
- Workspace edition: Enterprise
- Wait for your workspace resource to be created (it can take a few minutes). Then go to it in the portal, and on the Overview page for your workspace, launch Azure Machine Learning studio (or open a new browser tab and navigate to https://ml.azure.com ), and sign into Azure Machine Learning studio using your Microsoft account.
- In Azure Machine Learning studio, toggle the ☰ icon at the top left to view the various pages in the interface. You can use these pages to manage the resources in your workspace.
Create a compute instance
To run the notebook used in this exercise, you will need a compute instance in your Azure Machine Learning workspace. If you already have one, start it; otherwise, follow these instructions to create one:
- In Azure Machine Learning studio , view the Compute page (under Manage).
- On the Compute Instances tab, create a new compute instance with the following settings:
- Compute name: enter a unique name
- Virtual Machine type: CPU
- Virtual Machine size: Standard_DS2_v2
- Wait for the compute instance to start (this may take a minute or so)
Download the exercise files
The files used in this module (and other related modules) are published in a GitHub repository, which you need to clone to your Python environment. If you haven't already cloned the ai-fundamentals repository in a previous module, use the following steps to clone it to your Azure Machine Learning workspace:
In Azure Machine Learning studio , view the Notebooks page (under Author). This page contains a notebook editor that you can use to run notebooks.
Under My files, use the 🗋 button to create a new file with the following settings:
- File location: Users/your user name
- File name: Get-Files
- File type: Notebook
- Overwrite if already exists: Selected
When the new notebook has been created, ensure that the compute instance you created previously is selected in the Compute box, and that it has a status of Running. Then, in the rectangular cell that has been created in the notebook, paste the following code:
!git clone https://github.com/MicrosoftDocs/ai-fundamentalsUse the ▷ button next to the cell to run the code it contains. This will clone the exercise files from GitHub.
When the code has finished running and the checkout of the file is done, use the ↻ button under My files to refresh the folder view, and verify that a folder named ai-fundamentals has been created. This folder contains notebooks and other files used in the exercise.
Close the Get-Files.ipynb notebook tab.
Complete the exercise
After you have set up the Python environment and cloned the ai-fundamentals repository, you're ready to experiment with creating a bot.
- Open the QnA Bot.ipynb notebook in the ai-fundamentals folder. If you're using the notebook editor in Azure Machine Learning studio, use the ≪ button to collapse the file explorer pane and give you more room to focus on the notebook tab.
- Read the information in the notebook, and run the code cells it contains in order.
Clean-up
If you used a compute instance in Azure Machine Learning studio, you should stop it to avoid using Azure credits unnecessarily.
- In Azure Machine Learning studio, view the Compute page (under Manage).
- On the Compute Instances tab, select your compute instance and then use the Stop button to stop it.


Comments
Post a Comment